
Mastering the ZBoard MIDI Controller: The Ultimate Guide for Musicians and Producers
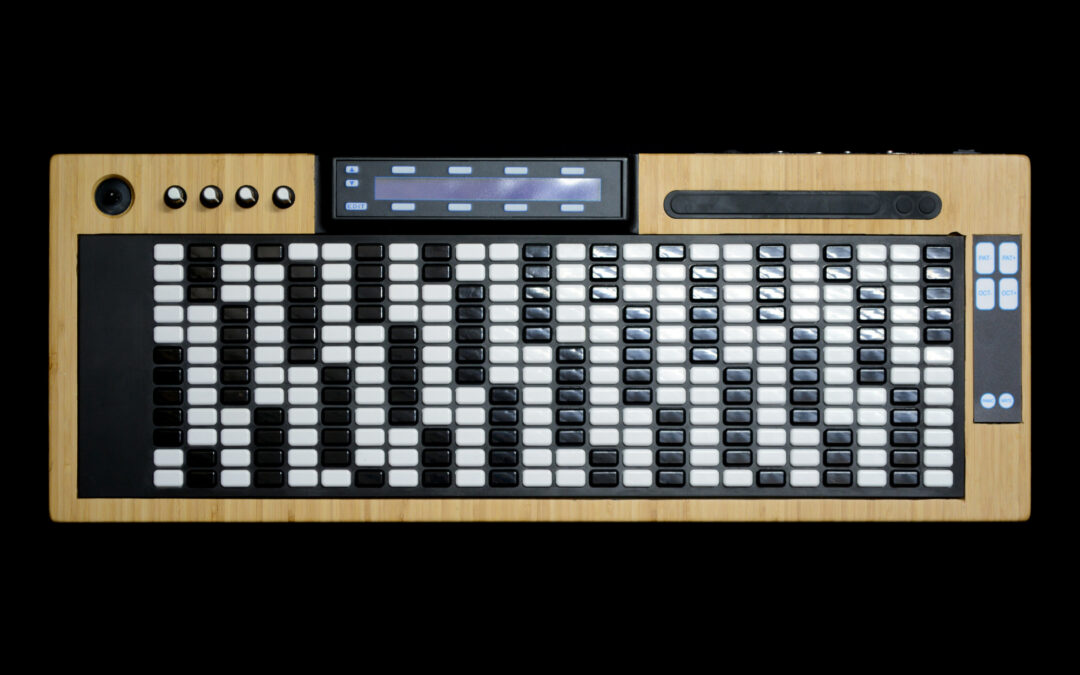
The ZBoard ZB12 MIDI Controller by Starr Labs is a special type of instrument, an Array keyboard. This means that the musical notes, the keys, are arranged in rows and columns. 24 “frets” or columns and 12 “Strings” or rows. The Strings are tuned chromatically like a two-octave section of a piano keyboard and the keys are colored to reflect the white and black keys of the piano. The Strings are offset by perfect Fourth intervals like a Bass guitar or the bottom 4 strings of a guitar. This means that you can use Guitar chords and scales as you learned them, and also it’s easy to see what key you’re in because of the Black and White pattern of the keys. It’s easy to “read” the keyboard by this unique pattern.
And because the tuning of the ZBoard defaults to Fourths tuning, any chord, scale, or progression can be easily transposed without learning new fingerings.
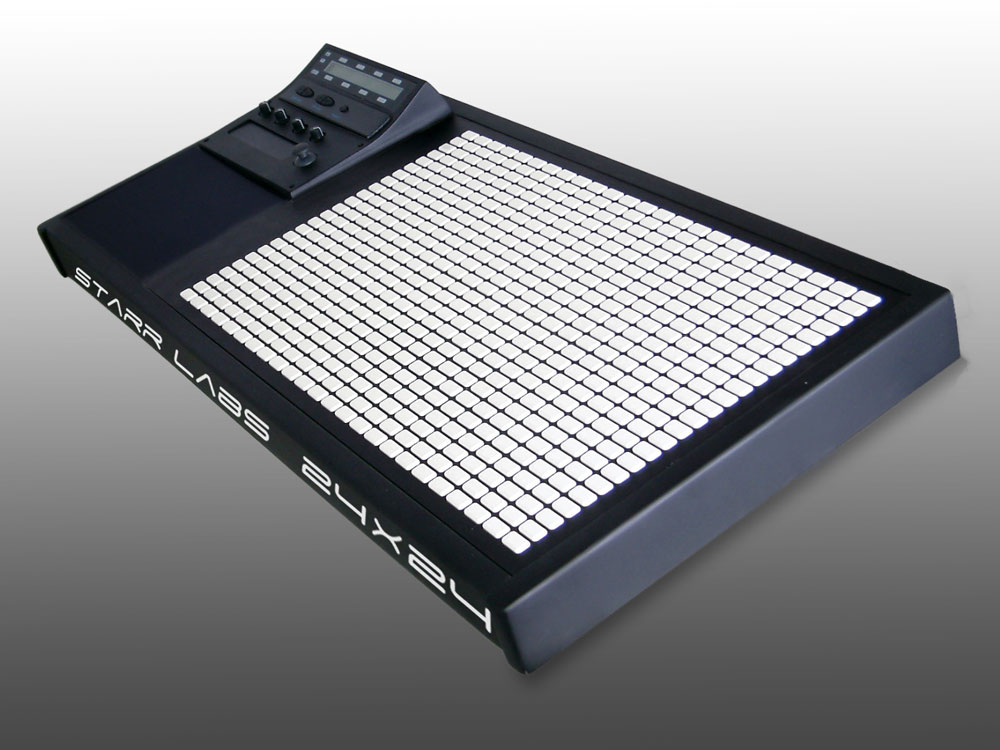
The ZBoard is not the only Array Keyboard but it was the first that was commercially available since its release in 1995 and it’s still the largest keyboard of it’s type, ranging up to 24 strings, or 576 keys in all in its largest form, the ZB24.
The 288 keys are touch-sensitive with a wide dynamic response.
The ZBoard is a gateway to a new level of creative control and musical expression because it places 5-1/2 octaves under each hand. It’s possible play chords and two-hands music that would be impossible to play on a traditional piano.
And for improvisation the tuning allows for multiple copies of each, like a guitar has, which means that there are multiple fingerings for everything you play and the note you want is always within reach of one hand position. By combining the characteristics of both guitar and piano it’s no longer as necessary to move to other positions on a guitar neck or keyboard.
Whether you want to trigger virtual instruments, create intricate chord progressions, or design immersive live performances, the ZBoard can transform your workflow in ways you never imagined.
If you’ve just unboxed your ZBoard or are looking to maximize its potential, this guide will take you through everything you need to know—from setup and programming to performance tips and troubleshooting. Get ready to elevate your music production and unlock the full potential of MIDI with the ZBoard.
Why the ZBoard Is a Game-Changer
Most MIDI controllers are either keyboards, pad-based grids, or traditional guitar-style MIDI guitars. The ZBoard stands out because it integrates all these elements into one device, providing musicians with the ability to (NO:play, trigger, and the ZBoard has no Triggers) control MIDI data in a way that feels natural and intuitive.
One of the most innovative aspects of the ZBoard is its programmable fretboard. Unlike a regular keyboard, each fret on the ZBoard can be assigned different notes, tunings, or MIDI functions—allowing for customized performance setups that suit any playing style. The sensors, including pads, pots, and pedals, give you even more control over effects, loops, and DAW automation, making it one of the most flexible MIDI controllers on the market.
For guitarists transitioning into electronic music production, the ZBoard offers an alternative that feels familiar yet expands creative possibilities far beyond what a traditional guitar can do.
Getting Started with Your ZBoard
Powering Your ZBoard
Before you dive into playing, let’s make sure your ZBoard is powered and ready to go. The instrument offers two main power options:
- AC/DC Adapter – Ideal for studio setups and long performances.
- USB Power – Perfect for quick setups and computer integration.
To power on the ZBoard using PB1 and AC/DC Adapter :
-
- Connect a 5-conductor MIDI cable from the ZBoard’s MIDI Output to the PB-1 Phantom power adapter that delivers power through the MIDI cable.
- Use another MIDI cable to connect the PB-1’s “SYNTH” port to your synthesizer, DAW, or MIDI-compatible device.
- Plug in the DC power adapter, flip the 3-position rocker switch to “DC”, and your ZBoard is live!
To power via USB:
- Connect the ZBoard’s USB port to your computer or USB power source.
- Set the power switch to “USB” mode, and you’re ready to go!
If you’re planning to use your ZBoard wirelessly, battery power is available as an option, making it great for stage performances where mobility is crucial.
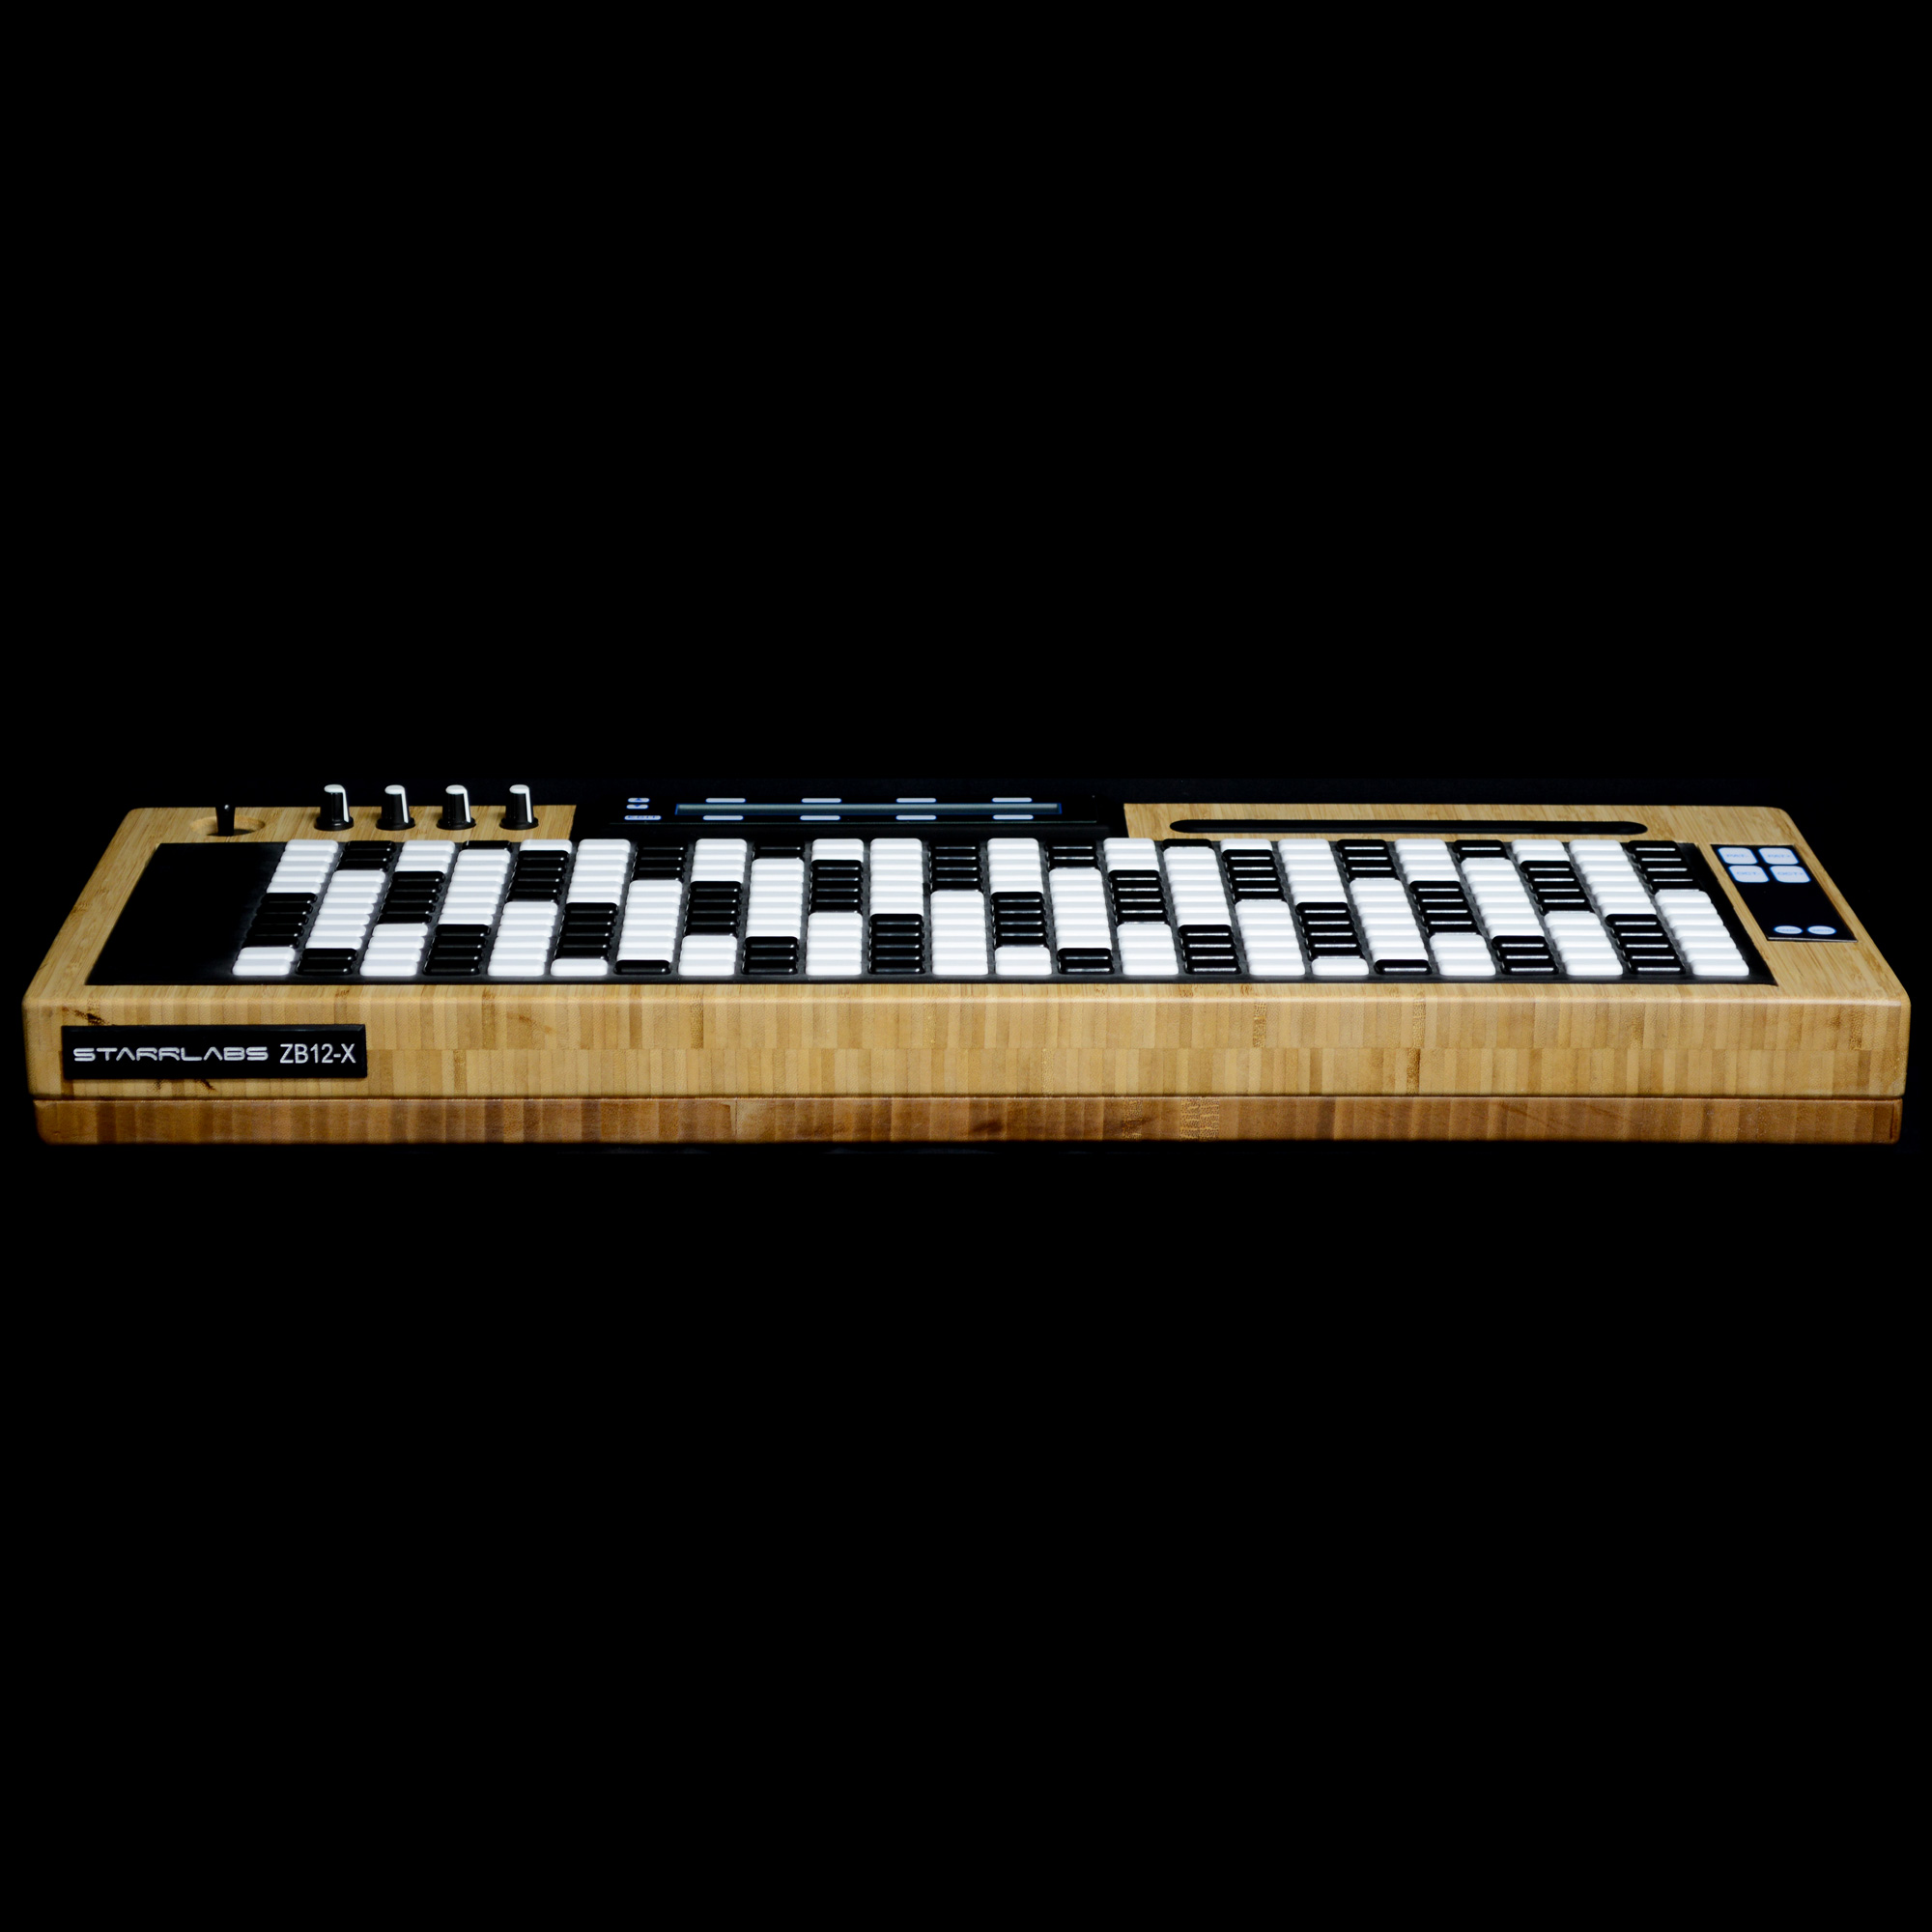
Understanding the ZBoard’s Interface and Controls
The ZBoard’s interface is designed for real-time control, giving musicians a fluid and intuitive experience when performing or producing. Here’s a breakdown of how the core components work together:
The Fretboard: More Than Just Notes
The fretboard is the heart of the ZBoard, offering a unique way to interact with MIDI data. Unlike a standard guitar, you can program it to:
- Assign custom tunings for different scales or instruments.
- Split the fretboard into zones, assigning different areas to control multiple instruments at once.
For example, you could set the lower frets to trigger basslines while using the upper frets to play lead synth melodies. This kind of flexibility is impossible on a traditional guitar but opens endless possibilities on the ZBoard.
The Sensors: A New Level of MIDI Expression
Beyond the fretboard, the ZBoard’s sensors offer additional MIDI control through:
- Pedals – Assignable to effects like volume swells, filter sweeps, or sustain.
- Pots (Knobs) – Can be used to adjust parameters in real time, such as modulation, EQ, or reverb depth.
With the right programming, these sensors turn the ZBoard into a powerhouse MIDI controller that can shape your sound on the fly.
Customizing Your ZBoard for Maximum Performance
Programming the Fretboard
One of the most exciting aspects of the ZBoard is the ability to customize the fretboard to fit your unique playing style. Here’s how you can set it up:
- Enter the Fretboard (Zones) Menu – This is where you define how different areas of the fretboard function.
- Set Keymaps – Each fret can be mapped to different notes, tunings, or MIDI events.
- Assign Velocity Curves – Control how the fretboard responds to touch, allowing for dynamic or fixed velocity output.
By setting up different zones, you can create multilayered performances, where different sections of the fretboard trigger different sounds simultaneously.
Taking Your Performance to the Next Level
Creating Layered Sounds with MIDI Zones
If you want to take things further, try splitting your fretboard into multiple MIDI zones. For example:
- Assign MIDI Channel 1 to the lower frets for bass sounds.
- Assign MIDI Channel 2 to the upper frets for lead synths.
- Use the expression pedal to crossfade between zones for a smooth transition.
This technique turns your ZBoard into an entire band, controlled by your fingertips.
Final Thoughts: Why the ZBoard Is a Must-Have MIDI Controller
The ZBoard isn’t just an instrument—it’s a full-fledged MIDI workstation capable of transforming how you create and perform music. Whether you’re using it to trigger synths, play dynamic chord progressions, or control your DAW in real time, it offers a level of flexibility unmatched by traditional MIDI controllers.
If you’re ready to take your music production or live performance to the next level, the ZBoard is the perfect tool. With limitless customization, multi-zone performance, and intuitive real-time control, this is one MIDI controller that stands out from the rest.
Need help getting started? Contact Starr Labs Support, or explore the online community of ZBoard users to discover new ways to unlock its potential!
Now it’s your turn—power up your ZBoard and start making music like never before!
ZBoard MIDI Controller – Frequently Asked Questions (FAQ)
1. What is the ZBoard MIDI Controller?
The ZBoard is a fully programmable MIDI controller designed for musicians, producers, and live performers. It features a dynamic fretboard, customizable sensors, and extensive MIDI capabilities, making it one of the most versatile MIDI controllers available.
2. How is the ZBoard different from a regular MIDI keyboard or MIDI guitar?
Unlike a traditional MIDI keyboard, the ZBoard mimics the fretboard of a guitar and can be easily learned, following the traditional Black and White layout od the piano. It allows you to map different tunings, trigger chords, and assign MIDI functions to different fretboard sections. Unlike a standard MIDI guitar, it doesn’t rely on audio-to-MIDI conversion, making it faster and more accurate for MIDI control.
3. Does the ZBoard produce sound on its own?
No, the ZBoard is a MIDI controller only, meaning it does not produce sound on its own. It must be connected to a synthesizer, virtual instrument, or DAW to generate sound. A sound card can be installed inside the ZBoard, or better use an iPhone or iPad as your sound engine for a setups that’s minimal but is versatile and sounds great.
4. What are the power options for the ZBoard?
The ZBoard can be powered using:
- AC/DC Adapter – Connect via the PB-1 Phantom Power Adapter.
- USB Power – Plug directly into a computer or USB power source.
- Battery Pack (for wireless models) – Allows for cable-free operation. (On request)
5. How do I connect the ZBoard to my computer?
Simply connect the ZBoard via USB to your computer. Our USB is plug-and-play and does not require additional drivers for Mac or PC.
6. Can I use the ZBoard wirelessly?
Yes! Some ZBoard models include an RF MIDI Transmitter, which allows you to control synthesizers, DAWs, and MIDI devices without cables.
7. How do I customize the fretboard?
Access the Fretboard (Zones) Menu via the Edit button.
Define zones to split the fretboard into multiple performance areas.
Assign custom tunings, MIDI notes, or instrument layers to different zones.
8. Can I use the ZBoard with hardware synthesizers?
Yes! The ZBoard has a MIDI OUT port, allowing it to connect to any MIDI-compatible hardware synth or drum machine.
9. How do I switch to tapping?
Press the TRIG button to toggle between:
Tapping Mode – Ideal for playing fast lead runs and synth-style lines.
10. Can I split the fretboard to control multiple instruments?
Yes! The ZBoard supports multi-zone mapping, meaning you can:
Assign different sections of the fretboard to separate MIDI channels.
Play bass on the lower frets while playing synth leads on the upper frets.
Use the expression pedal to crossfade between layers.
11. What are the function hotkeys, and how do I use them?
Function HotKeys allow for quick adjustments while performing, including:
PATCH+/- – Change synth presets.
OCT+/- – Shift octave range.
12. How do I assign effects and DAW controls to the ZBoard’s sensors?
Enter the Sensors Menu via the Edit screen.
Select a sensor (pad, pot, pedal, etc.).
Assign it to control effects, volume, filter sweeps, loops, or DAW automation.
13. Can I play different tunings on the ZBoard?
Yes! You can but this isn’t really a thing on the ZBoard because of the fixed Black and White key layout. However for those who want to experiment with tunings the ZBoard can be delivered with special key patterns or no pattern at all. Notes and tunings can them be identified using small repacea ble vinyl stickers:
Assign standard guitar tunings like Drop D or Open G.
Create custom tunings for unique scale arrangements.
Program each fret individually for full control over note placement.
14. How do I adjust the sensitivity of the fretboard and sensors?
Navigate to the Response Menu, where you can:
Adjust touch sensitivity for more dynamic playing.
Set velocity curves to control MIDI dynamics.
15. What is the ZBoard’s compatibility with DAWs?
The ZBoard is compatible with all major DAWs, including:
Ableton Live
Logic Pro X
FL Studio
Cubase
Pro Tools
It can be used as a MIDI input device to control virtual instruments, drum machines, and synths.
16. Can I use the ZBoard to control effects in real time?
Yes! You can:
Use the pads to trigger effects or automate parameter changes.
17. How do I fix unresponsive sensors or fretboard notes?
If a sensor or fretboard note isn’t responding correctly:
- Check the response in the Response Menu. Adjust the lower threshold, Gain and response curve as needed.
If you’re getting no response at all:
- Check the power source (USB, AC/DC adapter, or battery pack).
- Ensure all MIDI connections are secure.
18. Can I save my custom settings?
Yes! The ZBoard has battery-backed memory, meaning you can:
Save custom performance setups and presets. 30 programmable presets.
Quickly recall saved settings for different songs or live performances.
Save your settings to an external computer or DAW and reload them via Sysex.
19. Where can I find additional support and resources?
For help with your ZBoard:
Visit Starr Labs Support for firmware updates, manuals, and troubleshooting guides.
Join ZBoard online communities to connect with other users and share tips.
Contact Starr Labs customer support for direct assistance.